USB Generic HID Open Source Framework for Atmel AVR and Windows
Contents
The Atmel AVR range of USB capable devices provides a wide-range of functionality and peripherals to the professional and hobbyist; however the additional complexity of both microcontroller firmware and host PC drivers is a tall barrier to anyone wishing to get started with USB development. Although the firmware is greatly simplified by freely available open-source USB stacks (such as LUFA) there is still the requirement for a base of AVR software, Windows software and physical hardware to support the application. The USB Generic HID Open Source Framework for Atmel AVR and Windows solves this issue by providing a ready-made framework on which to build your applications.
The framework includes a reference hardware design, a reference firmware design and a Windows based DLL library and host-test application. By providing a tested, working base for development, the framework greatly eases the task of both learning USB development and building USB driven devices.
By providing a USB interface based on the Generic HID protocol, the framework provides a highly flexible interface without the requirement for custom USB drivers on the host (since Generic HID is supported natively by Windows, MacOS, Linux, etc. using built-in drivers).
YouTube Demonstration Video
Reference Hardware
Out of the box the reference firmware should function with any ATmega32U4 based board (however for the demonstration application the LEDs and switches must be mapped correctly). You can see the recommended reference design on AVR ATmega32U4 USB Development Board which shows how to build your own reference hardware or (for those who are not comfortable with SMD soldering) how to make the board using a Teensy2.0 which can be either placed in a breadboard or built using a simple single-sided through-hole PCB design.
In order to support the framework the hardware really only needs the minimum number of components to support the USB interface and run the AVR however, for a more useful demonstration, 4 LEDs, 2 switches and a potentiometer is included allowing the demonstration code to show how you use the framework to monitor, set and communicate the state of such peripherals between the AVR and Windows.
Please note that (if you use a Teensy2.0) it has a pre-programmed closed-source boot-loader which, once removed, you cannot reprogram onto the board (since PJRC do not publish the code). However the LUFA library provides a replacement open-source boot-loader if you wish to use USB based programming again.
ATmega32U4 Firmware
The reference firmware is an AVR Studio 5 project which includes both the framework code and the required parts of the LUFA stack. There are two independent firmware types the ‘reference firmware’ which provides the ability to test and verify the framework and the ‘demonstration firmware’ which provides a simple demonstration of how to use the framework to read and set peripherals connected to the AVR.
Please note that the provided firmware is not optimised for minimising code foot-print. It is recommended that all unnecessary code (commands, debug, board definitions, etc.) is removed for target application use. It’s perfectly possible to run both LUFA and the framework library on ATmega8U devices if required,
Reference Firmware
The first is the ‘reference firmware’ which provides 6 USB commands. 5 of the commands act as both a demonstration of the framework and also as a regression test tool to ensure the framework is functioning correctly. It performs the following 5 operations:
- Receive 1 packet from host, verify the packet contents
- Receive 1 packet from host, verify and then reply with 1 packet
- Receive 1 packet from host, verify and then reply with 128 packets
- Receive 128 packets from host, verify and then reply with 1 packet
- Receive 128 packets from host, verify and then reply with 128 packets
Since the USB Generic HID stack is configured to use 64 byte packets this means, in the most extreme test, the firmware receives 8 Kbytes from the host and replies with 8 Kbytes. The USB Generic HID protocol is very simple and (in essence) provides a mechanism for sending 64 byte packets to and from the host. The framework overlays this with both a command/data structure as well as a bulk send and receive mechanism for transferring larger amounts of data.
The 6th command provides a live debug stream over USB allowing you to receive debug from the firmware (on the host) as the code executes. The firmware provides a function to which you can send debug strings, the strings are stored in a fixed-length circular buffer and then copied to the host when the send debug command is received.
Since the RAM on-board the AVR is limited, and you can only process one command at a time, the debug mechanism is not suitable for very ‘chatty’ debug. However it provides a useful way to read live variables and watch the flow of execution when developing. If the firmware’s debug buffer is too full for a new string it simply discards the string meaning that debug messages are delivered in a FIFO manner without partial strings.
As the debug functions consume RAM on the AVR you can decide to include them (or exclude them) at compile time using the ‘USB_DEBUG’ compiler symbol. This leaves the debug function calls in the code but does not compile the debug code or the debug buffer.
Demonstration Firmware
The demonstration firmware is simpler than the reference firmware and provides 2 commands (plus the debug collection command). The first command reads the current state of the buttons, LEDs and potentiometer and passes this information back to the host. The 2nd command allows the host to set the status of the LEDs. For the buttons and LEDs the firmware relies on the built in board driver functions of the LUFA stack (which should make it very portable between different reference boards, of which LUFA supports many). In addition there is some simple ADC code which reads the value of the potentiometer.
Although the reference firmware has more USB capabilities, the demonstration firmware shows a more practical application of the framework.
Windows Applications
To match the available firmwares there are also two applications provided with the framework. Both are designed to be compiled in C# using Visual Studio 2010 (you can download the ‘express’ version of this free-of-charge from Microsoft).
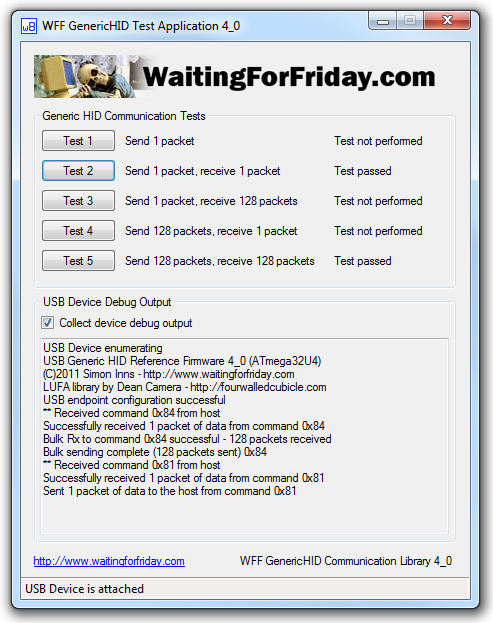
Reference Application
The reference application provides a Windows front-end allowing the user to trigger all 5 of the available USB commands as well as monitor the debug output. The application also provides automatic device attach and detach handling. When the user selects a test the application passes patterned data over to the USB device and verifies the patterned data it receives in reply. This provides both an example application using the framework and a simple regression test to verify the underlying Generic HID communication library.
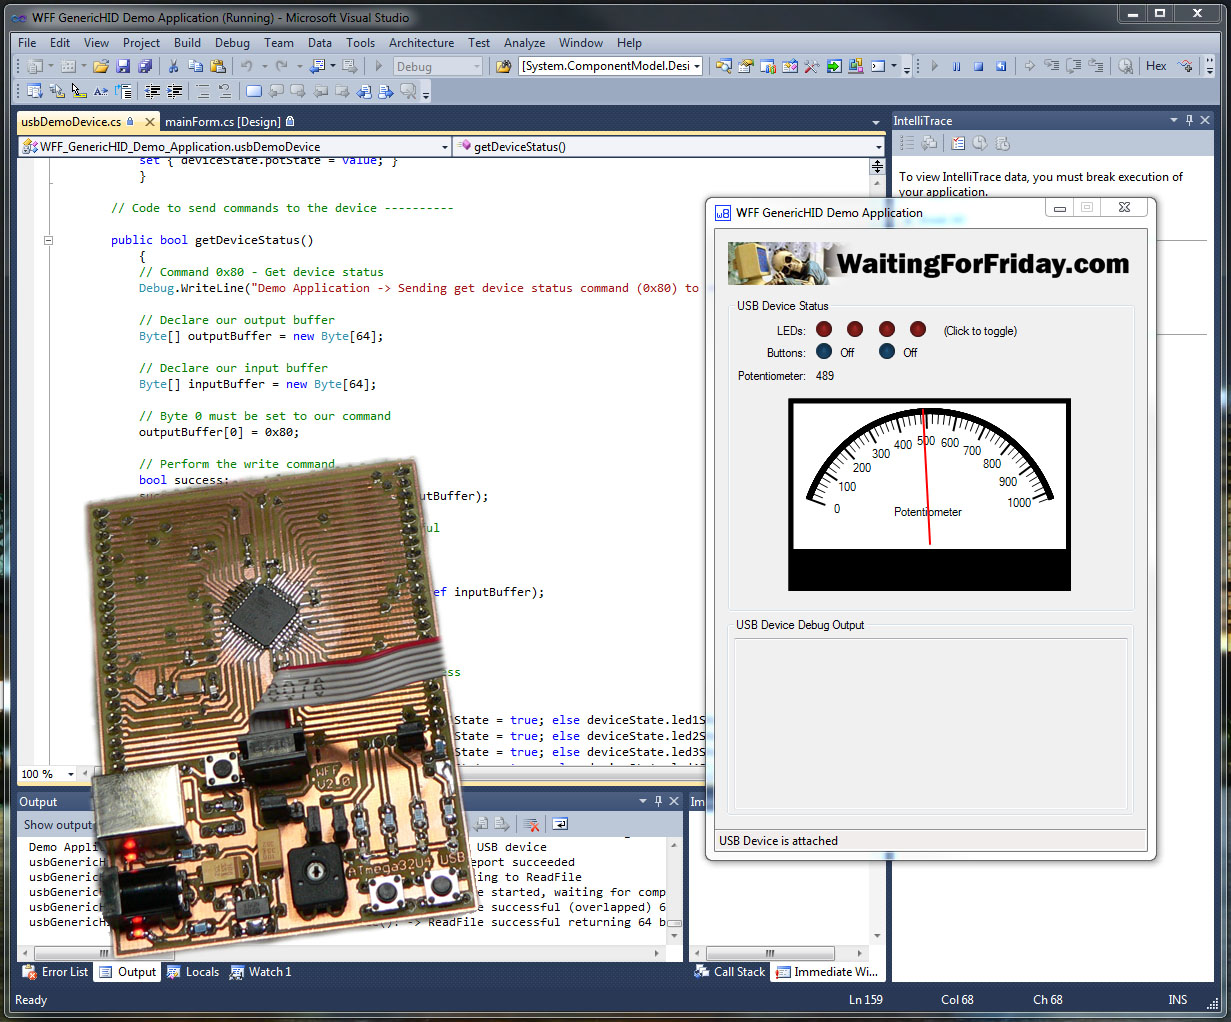
Demonstration Application
The demonstration application provides a Windows front-end which allows the user to interact with the hardware in real-time. It is possible to toggle on and off the LEDs, monitor the status of the switches and see a graphical representation of the potentiometer position:
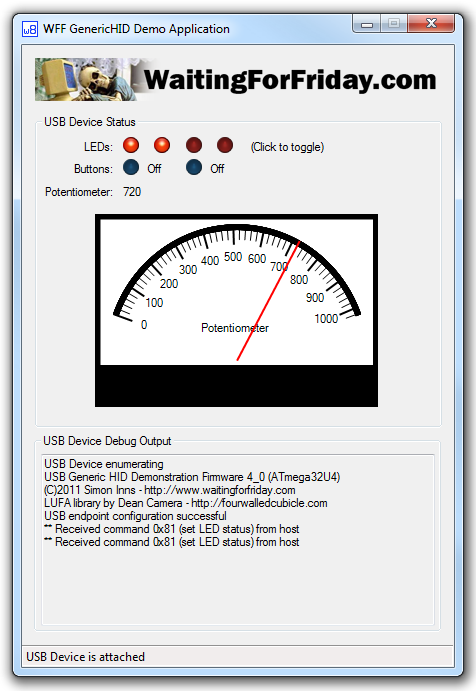
The demonstration application provides a useful example of how the framework can be used to create interactive hardware controlled via USB.
USB Generic HID C# Communication Library
The USB communication and USB specific functionality (such as device attach and detach detection) is provided by the USB Generic HID Communication Library which compiles as a DLL under Visual Studio 2010. This means the library can be quickly and easily included in any C# project which required Generic HID communication capabilities.
The communication library also provides extensive debugging output when compiled in debug mode. This allows you to quickly and easily track issues when developing.
Using the class library
Once you have included the class library project in your solution (please look at the provided applications to see how this is done) you will then need to add some lines of C# code into your main form in order to set up and use the libraries functions as well as defining the interface to your USB device.
Firstly you will need to create a class which represents your USB device and provides the methods to talk to it. You simply add a class to your project and name it after your USB device. In the demonstration application this class is called usbDemoDevice.cs. The class constructor is derived from the device constructor from the library and you can place any required initialisation commands in it; here is the example from the demo application:
class usbDemoDevice : WFF_GenericHID_Communication_Library
        {
        public usbDemoDevice(int vid, int pid) : base(vid, pid)
            {
            // Initialise the local copy of the device's state
            deviceState.led1State = false;
            deviceState.led2State = false;
            deviceState.led3State = false;
            deviceState.led4State = false;
            deviceState.button1State = false;
            deviceState.button2State = false;
            deviceState.potState = 0;
            }
Then you should provide a method for each command supported by your firmware (although you can use a single method to call many USB commands if required this would probably indicate that you have too many commands which should be optimised). Here is an example from the demo application which creates the 64 byte packet and then adds in the required command byte and parameter bytes before writing the report to the device (a report is the USB term for the packet):
public bool setDeviceStatus()
    {
    // Command 0x81 - Set device status
    Debug.WriteLine(
      "Demo Application -> Sending set device status command (0x81) to USB device");

    // Declare our output buffer
    Byte[] outputBuffer = new Byte[64];

    // Byte 0 must be set to our command
    outputBuffer[0] = 0x81;

    // Set the packet data according to the local LED status
    if (deviceState.led1State == true) outputBuffer[1] = 1; else outputBuffer[1] = 0;
    if (deviceState.led2State == true) outputBuffer[2] = 1; else outputBuffer[2] = 0;
    if (deviceState.led3State == true) outputBuffer[3] = 1; else outputBuffer[3] = 0;
    if (deviceState.led4State == true) outputBuffer[4] = 1; else outputBuffer[4] = 0;

    // Perform the write command
    bool success;
    success = writeSingleReportToDevice(outputBuffer);

    return success;
    }
Once you have your USB device class and methods defined it’s time to go back to you main form and add in some code to invoke and use the device class. Firstly you need to place some code into the main forms constructor method to initialise the device when the form is loaded and then you need to create an instance of your USB device, here is the example from the demo application:
public mainForm()
        {
        InitializeComponent();

        // ATmega32U4 example firmware uses VID=0x03EB and PID=0x2150
        theUsbDemoDevice = new usbDemoDevice(0x03EB, 0x2150);

        // Add a listener for usb events
        theUsbDemoDevice.usbEvent += new usbDemoDevice.usbEventsHandler(usbEvent_receiver);

        // Perform an initial search for the target USB device (in case
        // it is already connected as we will not get an event for it)
        theUsbDemoDevice.findTargetDevice();
        }

// Create an instance of the USB reference device object
private usbDemoDevice theUsbDemoDevice;
Next you have to create a listener for USB events which are captured by the library. These events inform your application when the target USB device is added or removed from the host. Here is a simple example of such as listener method:
// Create a listener for USB events
private void usbEvent_receiver(object o, EventArgs e)
        {
        // Check the status of the USB device and update the form accordingly
        if (theUsbDemoDevice.isDeviceAttached)
            {
            // USB Device is currently attached

            // Update the form's status label
            this.usbDeviceStatusLabel.Text = "USB Device is attached";
            }
        else
            {
            // USB Device is currently unattached

            // Update the form's status label
            this.usbDeviceStatusLabel.Text = "USB Device is detached";
            }
        }
After this all that is left is to add some controls to your form which trigger the various supported commands to and from your USB device. This is very application specific, however both provided applications should show clearly how this is achieved.
Class Library Methods
The USB Generic HID library provides a simple interface to the underlying complexity of USB communications in Windows. The library is deliberately designed to be as simple as possible to program with. Here are the public methods which are supported and their function:
void findTargetDevice()
This method fetches a list of the currently attached HID devices, then it searches through the list looking for a HID device with the correct VID and PID for the target device. It is used to discover a device which may already be plugged in when the application initialises.
void usbEventsHandler(object sender, EventArgs e)
The usbEventHandler method allows the application to listen for events which are cause by the target USB device (attach and detach events).
WFF_GenericHID_Communication_Library(int vid, int pid)
This constructor method creates an object for HID communication and attempts to find (and bind to) the USB device indicated by the passed VID (Vendor ID) and PID (Product ID) which should both be passed as unsigned integers. This is the base class to be used when creating a class for your own USB device as described above.
bool isDeviceAttached
This method provides a simple mechanism for the application to check if the USB device is still attached. It returns true if the device is available and false if it is not.
bool writeSingleReportToDevice(Byte[] outputReportBuffer)
This method writes a single report to the device. The outputReportBuffer must be the correct length for the report (which set at the maximum value of 64 bytes in the example applications). It returns true on success and false on failure.
bool writeMultipleReportsToDevice(Byte[] outputReportBuffer, int numberOfReports)
This method writes multiple reports to the device in a single operation. The outputReportBuffer must be 64 byte times the number of reports to be sent. It returns true on success and false on failure.
bool readSingleReportFromDevice(ref Byte[] inputReportBuffer)
This method reads a single report from the device and places it in the referenced inputReportBuffer (which must be 64 bytes). It returns true on success and false on failure.
bool readMultipleReportsFromDevice(ref Byte[] inputReportBuffer, int numberOfReports)
This method reads multiple reports from the device in a single operation. The inputReportBuffer must be 64 byte times the number of reports to be read. It returns true on success and false on failure.
Licensing
The Generic HID library, firmware and example applications are published under the OSI approved MIT license which is a very permissive open-source license allowing the use of the project code in both open and closed source application both commercially and non-commercially. The only requirement is attribution, i.e. your code and/or documentation should contain a statement such as ‘Contains portions of the WFF GenericHID Communication Library which is (c)2011 Simon Inns – https://www.waitingforfriday.com‘.
The underlying LUFA USB stack is also MIT licensed and details of the appropriate/required attribution is contained over on the LUFA project website. Many thanks to Dean Camera and the LUFA contributors for the library; it is an excellent light-weight library that supports a wide-range of USB protocols and USB development boards.
Files for download
The windows applications, HID library and AVR firmware projects in Visual Studio C# 2010 projects and AVR Studio 5:
Hi mister Friday, how would you say you could achieve in data transfer speed if you were using an Atmega32u4 as a pass-thru to SPI and send data from a PC using the HID protocol to download 128Kbyte of data from an SPI EEPROM or more from a NOT FLASH chip.
There is the 64 bytes buffer limit and the 1ms latency of USB 2.0.
This would make 64Kbytes/S. But there is also the limited RAM of the 32u4 and the SPI Clock limit.
Let’s say we would reserve 512 or 1024 byte for transfer.
Would you any ballpark idea?
Thanks you.
Generally, using USB HID, the answer would be ‘very slow’ 🙂 USB HID is not really the right USB protocol to use for data transfer. However, there is support in the underlying LUFA USB firmware for such purposes and the LUFA project provides example projects and code. Have a look at LUFA and the protocols that support bulk transfer over USB (such as those used by USB memory sticks) and control transfers. That way you can to around 3Mbits/sec (IIRC). More than that and you’ll need a faster microcontroller.